Design Make Share: Foldable Tetrahedron Example
How does the Design Make Share method work? Here is an example.

PROBLEM/CHALLENGE: How can an object be printed that has smooth sides? (3D printed object can have a layered surface texture as an artifact of the printing process.)
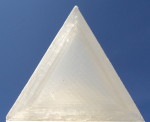
DESIGN: I was brainstorming and realized that by printing an object flat on a smooth surface, the object could be folded into shape and have a smooth surface on all sides. I decided that I would design a tetrahedron. I created the design in a program called FreeCAD. Designing a flat object that could be folded into a tetrahedron required careful examination. What are are the angles for the triangles on the face of a tetrahedron? How many faces does a tetrahedron have? What are the internal angles where faces meet? What are the angles of the folds (bisected internal angles)? How to connect the faces so the object would fold into the right shape? I saved an .STL file of the design for use.
MAKE: I used Slic3r to slice the model for 3D printing. Right away I found out there was a problem with my 3D model and I had to use a program called Netfabb Studio Basic to repair it. I was then able to use Slic3r to create a gcode file with the instruction on how to print the tetrahedron. I used Repetier-Host to send the gcode instructions to my Printrbot LC. The result was a very tiny model that could fold into a tetrahedron but quickly fell apart. I went back to FreeCAD and scaled the part up and made the first layer a little thicker. I then repeated the steps to get a foldable tetrahedron with smooth sides!
SHARE: I shared my design and photos of my tetrahedron at http://www.thingiverse.com/thing:78075 and on this blog. Now others can benefit from my idea on how to print a 3D object with smooth sides.
I could have read about high resolution printer that produce smooth prints. Instead I learned about digital design software, the construction of a tetrahedron, fixing STL files, 3D printing, blogging and publishing open source designs. Which experience do you want for your students?
Awesome. I’m wondering if this could be used as a tangible learning mnemonic as well? Students could put “stuff” on each side. The “stuff” could be curricular in nature, like a vocabulary word for the subject matter. Each side could have the following: the word, a definition, a picture, and a QR code to a video (or even a piece of audio to hear the word read aloud). It’s like a sturdy foldable!
I would love to design an example of a tangible learning mnemonic with you. I have been wondering if having a vocabulary word as a 3D object would be beneficial for students. Hands on learning! Do you have a simple example you want to try?
As soon as I wrote the idea I started to wonder about replication. That is, if a student were studying vocabulary terms, they’d need multiple pyramids each with a word on it. How could we replicate the activity of studying a set of words? One idea might be, at the high school level, to go class specific based on the unit currently being studied. For example, “Here are ten biology terms you need to know for this project.” There could be ten pyramids with Velcro on each side. In this way, the pyramids could be used again later on which new vocabulary words (and their corresponding elements- pic, QR to vid, definition, etc.) could be affixed. Then, for the next project, a few weeks later, the old vocab words could be ripped off and replaced with ten new ones. I’m wondering, if you were to create an example, if the word “cell” would be a good one with which to start (or ask a biology teacher, but any content would work)?